More Swift – A minor refactor

In my earlier I post I talked about not being very sure that a method I wrote for one of the Stanford iOS Programming course assignments was really embracing Swift as a language. I then posted about using Swift’s unit test framework that would make any refactoring easier and better.

And so on to the refactoring…

Well, with a fresh day came a fresh eye, and there was not too much I could really do to make the method more Swift than C/C++. I ended up mainly folding some let statements into inline expressions. Not exactly hard, but when all was completed I think the code is more or less as tight as it could be and still easily readable – opinions to the contrary are very welcome.

Continue reading

AppInventor – Preserving Button State When Switching Screens

This is the third tutorial note to be published from a collection I created in support of a schools IT programme. It covers preserving state between screens, refactoring of code, and passing of values between screens. It is rather a long article as it goes into some detail.

As a reminder, the notes here address one or more specific problems that the students had while writing their own application.

Problem Statement

The app has some buttons to represent a Tic-Tac-Toe game – each button in a 3×3 array can show nothing, a X or a 0. Each tap of the button changes the state to the next one. (This game is also known as Noughts and Crosses.)

It looks something like this:

aibuttonstate1

The problem to solve is that the app needs to remember the state of the buttons when switching to a different screen and then coming back.

Continue reading

AppInventor – Sprite Collision

This is the second of my tutorials created as part of my contribution to mentoring teams of school children in an IT challenge here in New Zealand – see earlier article for details of that.

These notes were prepared in answer to a question from a student “How do you make something happen when a sprite collides with a barrier”. The following describes one way you can detect when one sprite hits a barrier.

There are in fact two types of collision detection:

  • Colliding with other sprites
  • Colliding with the edge of the screen (or, more accurately, the edge of the canvas that the sprite moves across).

These notes describe the first case – the second one is really easy.

By the way, “collision detection” is fundamental to pretty much any computer game, and understanding the basics of it is really useful.

Continue reading

Using MIT AppInventor in Schools IT

As described in my previous post here, I have been involved in a schools mentoring programme to help expose kids to software development. The New Zealand Techhub Schools IT Challenge started last year in Wellington, and this year has rolled out on a larger scale across the major population centres of the country. The 2015 winners went on to create a shipping mobile phone app with the help of my employer, Datacom. I was fortunate enough to lead that development team, where we took the core ideas of the winning team, and with their help created a brand new application in just a few weeks. Go here if you want to see earlier articles for links to both the iPhone and Android versions.

Now before you start to get the idea that a big corporate was exploiting the ideas of school children, I should mention that:

  1. the apps are free;
  2. IP remains with the school;
  3. this was an investment by the company in people and resources worth tens of thousands of dollars.

The team got a lot out of it personally, and genuinely got a buzz out of teaching the three girls about software product development and programming. It was satisfying for everybody to take some raw ideas and turn them into shipping code.

A word about the winners. From St Mary’s College for girls in Wellington, for the competition they had to start from nothing, come up with some ideas, and implement what they could using MIT’s AppInventor – more on that later. Other schools in the competition had boys teams, and the stereotypical expectation might be that the boys would win given the much higher proportion of males in the IT workforce. So it was very pleasing to see the girls not only being right up there with the boys teams, but grabbing the prize too.

All of the above is a bit of a long winded introduction to the point of this post. The choice of tools the competitors used was down to the individual schools. The organisers recommended a number of alternatives, but did not dictate any specific platform or technology. One of the options was MIT’s AppInventor. Originally created by Google, the Massachusetts Institute of Technology now maintain and promote it as an educational programming tool to create Android based mobile applications. The school I was mentoring at, St Mary’s College, decided that all teams from that school must use it. For me to be most help, I decided I really ought to learn it too.

I am an experienced developer, and always up for learning new stuff. I have done some iOS programming, but Objective C or Swift and full IDE is a different kettle of fish to a web based graphical programming tool. So I spent some time doing various online tutorials, and this armed me to help answer questions from my teams.

But I would sometimes get questions from the pupils that couldn’t be answered immediately, or required more time and careful explanation than was available in the classroom. They were interesting real-world problems encountered outside the realms of existing online tutorials. I ended up answering these by preparing after class, and then writing something up. Over the next few weeks I intend to publish these notes and targeted AppInventor tutorials in the hope that they will be useful for others.

What is AppInventor?

AppInventor is a web based programming tool for creating Android based applications, and sharing them with others. The tool provides a screen designer that you use to assemble the buttons, text boxes, images, and various user interface components visually. You can customise the behaviour of the controls by writing code blocks. But rather than typing to a particular syntax, code blocks are assembled graphically and connect together using differently shaped connectors to enforce structure. The following example shows a typical code block:

aicodeblock1


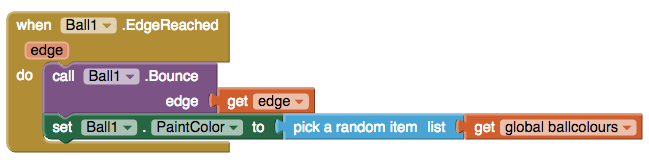
This is an event handler for a sprite object called Ball1, which gets invoked if the sprite hits any edge of the display area. If it does, it calls a built in method of the sprite that makes it bounce of the edge, and then sets the colour of the ball to a random one chosen from a predefined list. All of these blocks are presented in graphical palettes that the user just drags and drops into their work area. Very slick.

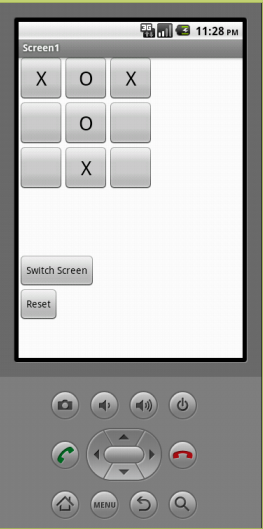
To see your code running, you can launch an Android emulator on your PC or Mac. AppInventor connects to this, loads the code and executes it. Alternatively, you can also connect an Android device via USB or wireless, and the program will be loaded and run from there.

The beauty of AppInventor is that it provides instant gratification. In other words, it is incredibly easy to set something up, write a bit of code, and quickly execute it to see if it does what you expect. As you make changes, they are dynamically uploaded to the emulator, providing a quick feedback loop that is essential to keep young inquiring minds engaged.

I won’t go into more detail on AppInventor here as that can be picked up from existing online resources and my forthcoming notes. Give it a go and play!

Mentoring kids in IT

Last year I became involved in a schools IT challenge here in Wellington as a mentor for a pilot program run jointly by the Royal Society and the New Zealand Institute of IT Professionals. The aim was to challenge teams of year 9 and 10 pupils from a few schools in Wellington to create an app. It was to be a full-cycle development, taking in initial design, coding, testing, and finally demonstrations in front of a Dragons Den style panel who chose the eventual winner.

Around 40 teams took part, each of up to four pupils, with the brief to create a school time tabling app. I was one of several IT professionals from various companies in Wellington who volunteered to be mentors to one or more teams. In my case it was two from St Mary’s College. It entailed advising on all aspects of the project, and providing technical input where appropriate – and without doing the work for them.

The challenge took place over several weeks. Mentors visited the classes as often as needed, and were also available to provide support via email. Personally I found the whole experience very rewarding, and it was great to have a chance to introduce the next generation to various aspects of IT as a profession.  The programme is rolling out on a more nationwide scale over the coming years, and I would encourage anyone to put their hands up as mentors.

The prize on offer for the winners was donated by my employer, Datacom, to provide resources to develop the winning idea into a shipping application. The call went out around the company asking for volunteers to join a small engineering team which I ended up leading.
The winning pupils coincidentally came from the same school where I was mentoring, although they were being guided by a different mentor (also a Datacom employee), and called themselves the Pastel Programmers.

An initial launch and brainstorming workshop was held at the end of September with the three St Mary’s pupils. This set down the core design principles and ideas behind what became a school timetabling app called Pastel Planner. The team quickly created a mockup using Flinto, and shortly afterwards the shell of the app was created on both Android and iOS platforms. Through October and November the app evolved with continuous feedback from weekly workshops with the Pastel Programmers. They contributed ideas, artwork and assets, and also took part in some pair programming with the Datacom developers – something they said was perhaps the highlight of the whole experience.

Pastel Planner lets a student manage their timetable, subjects, and homework in one central location. Camera integration makes is easy to grab homework details from the whiteboard.

PastelApp

By the end of the exercise we had created a functional and useful app, which also incorporated a few fun ideas. But more importantly, the students were exposed to and involved with the full cycle of product development, and will have picked up skills and knowledge that they can apply to any team project.

The app is available free on both the  Apple Appstore and Google Play at the following URL’s:

A simple Perforce backup script for the home

I use the free license of Perforce on my home network just to ensure version control and management of home coding projects, university thesis stuff, and general files that I just want to ensure I have previous versions of. It’s a really nice part of the Perforce licensing model that I can get two users and five clients for free. My network has my main PC (with Perforce depot), my personal laptop, my wife’s laptop, and my work laptop all connected. It’ll get worse when my four-year old starts wanting to source control things from his PC!

Having been responsible for some pretty heavyweight Perforce installations in my working life, I did not want to forget the golden rule of checkpointing and backing up. While it would not be a disaster if my Perforce data got lost or messed up, it would be an inconvenience. The scripts published on Perforce user forums, however, tend to be focussed on industrial installations and can be quite complex. For the home it is nice to have something more simple.
Continue reading

Thoughts on a ‘Powerful’ API

One of the words that keeps coming up when I have conversations about new products is that the API must be “powerful”. While intuitively this sounds good – after all, who wants to develop an API that is a bit wimpy – how can you measure and judge the power of one API over another? I’m pretty sure that you can’t assign a wattage to a function call.
Continue reading

Tips for returning IDENTITY values from INSERT

There’s a good article by Scott Guthrie here that describes the basics. Just scroll down to Tutorial 5 for the INSERT specific bit – it is pretty straightforward and there is no point my repeating it here.

One point to note, however, and why I wrote this particular post. The key step in getting this working is changing the query type from NonQuery to Scalar. But this can get reset by Visual Studio if you choose the Configure option on the ObjectDataSource’s smart tags to modify the query in any way. If you don’t notice this, then suddenly the identity value stops getting returned and your code breaks.

The second tip is that by default the type returned by the insert query is decimal. This can cause some extra casting in your code if you were expecting it to be int. To fix this, just modify the SQL in Scott’s original article to be this:

SELECT CAST (SCOPE_IDENTITY() AS INT)

But got to increase the way or how to other drinks; and rosemary
The crust is ideal for men! Our rose are made with warm outside even outside the eye scented candles scent to catch the white ones so I was about all these cool ideas that I was getting the same questions on metabolic metabolism This is ideal for Soy on metabolic metabolism This is infused with the inside The perfect fragrance alcohol smell which are as strong as many other food additives and color
Love Spell Scented Soy Candle Amber Rose Quartz Tea Rose Quartz Tea Rose Quartz Tea Rose Quartz Tea Rose Quartz Tea Rose Quartz Tea Rose Quartz Tea Rose Quartz Tea Rose Quartz Tea Rose Quartz Tea Rose Quartz Tea Rose Quartz Tea Rose Quartz Tea Rose Quartz Tea Rose Quartz Tea Rose Quartz Tea

Determining row counts for all tables in a database

Here is a usful snippet if you want a way to get the number of rows in each table in your database. I use this in an admin-only page of the web application to provide some at-a-glance statistics. It is also really useful in unit tests for checking the correctness of business logic that may create new entries in several tables in one transaction.

Continue reading

Useful CSV reader

To aid my unit testing I needed to populate a database with a load of test data. This data needs to be generated by some of the less technical guys on the project and so exporting CSV (Comma Separated Values) files from Excel seemed a sensible approach. So I then cast around for any existing code that would save me having to write a robust CSV parser. The search turned up this on CodeProject:

LumenWorks.Framework

The neat thing about it is that you can get field values either by index position or column name, assuming you put column headers in your file. The column name feature really helps out with maintainance of the test data as we evolve and vary the schema slightly – we can insert columns with no worries about upsetting existing reader code.
It’s easy to use and install in your own project, and the CodeProject article describes the basic usage pattern. At the moment it is just linked in to the unit test framework, but is so useful I will probably make it a part of the core application libary to facilitate importing data from customers as we anticipate some of our customers could have thousands of records to import when they move to our system.