
This article is from some notes I made when helping out as a mentor for a schools IT challenge – see recent posts for more details. A common problem the pupils had was that they would create their pages in an arbitrary order driven by their individual learning processes. After developing their app further at some point they would want to reorder these screens so that a specific one would appear as the start screen when the app runs.
It turns out setting this in AppInventor is surprisingly difficult and is certainly not obvious. My solution below may not be the best, and is more of a workaround to what is probably just a current limitation of AppInventor. If future updates make this better, I will update this post.
When you run your app, which screen appears first depends on how the app is run.
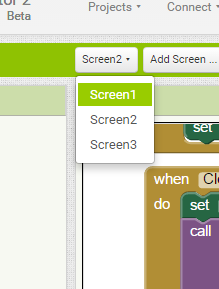
In the first case, when you have AppInventor running and you connect to the emulator, the screen that appears is the one that you are currently editing. So if you want to ensure a particular screen appears first when running the emulator, just select it from the screen drop down:
The second circumstance is when you run the app from the phone’s (or emulator’s) home screen. In this case, the app always starts with the first screen in the list.
The tricky thing is if you want to have a different screen than the first one to be the startup screen. I cannot see any easy way to do this. As a workaround the general approach is to copy the current first screen to another screen, then replace the contents of this screen with a copy of the components from your desired start screen. Details of how to do this are:
- Create a new screen. Let’s call this ScreenX.
- Copy all the controls and blocks from Screen1 to ScreenX.
You then have a couple of choices:
- If the second screen in the list is now the one you want to be the first, select Screen1 and choose “Remove Screen”. This will move the desired second screen be the first one.
- If the screen you want to be the first screen (let’s call this ScreenY) is further down the list, then you will have to
- Delete all the controls and blocks from Screen1.
- Copy everything out of ScreenY into the now empty Screen1.
- Remove ScreenY.
Copying between screens is unfortunately a manual process. It might be easier if you have two computers side by side with the same project loaded into AppInventor, and refer to the original while making changes. This may work better if you make a safe copy of the original project and use this for reference.
You can use the Backpack to make copying a block from one screen to another easier. To do this, grab a code block and drag and drop it onto the backpack icon: 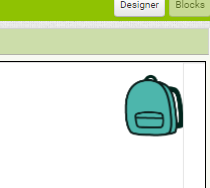
You can then switch to your destination screen, and when you click on the backpack again a copy of the block will be displayed, and you can move it out of the backpack.
I will keep looking for a better solution. It could be for demonstration purposes you can ignore the start screen issue by running the demo from AppInventor using the emulator, and just ensuring you have your preferred screen selected as described above.
Finally, as a general bit of advice, I would suggest using meaningful names for a screen when you first create it. E.g. “StartupScreen”, “LoginScreen”, “QuizScreen1” etc. This will help you when editing different screens as you won’t need to remember that “Screen2” is for one thing. “Screen5” for another etc. It may also help you if you ever need to merge two projects together as there is less likelyhood of a name clash which will prevent the merge. Merging projects will be a topic for a later note.