3 Peaks Challenge – Part 2: The hikes

Setting off, 5pm Friday

Setting off, 5pm Friday

In this second article on my recent 3 Peaks challenge I describe the hikes themselves and the transits between the mountains. See Part One for a description of the challenge.

My personal times were:

Mountain Start Summit reached Back at base Distance
Ben Nevis 5pm 7-50pm 10pm 10 miles
Scafell Pike 4-30am 6-30am 8-30am 6 miles
Snowdon 1-45pm 4-10pm 7-30pm 8.5 miles

So as you can see I did succeed and completed it – I got to the top of Snowdon in a shade over 23 hours. I was a little disappointed not to get down again within 24 hours, but as you will discover when you read the account of each mountain, I just count myself lucky to have even finished at all, irrespective of times.

Continue reading

Flickrvision – A Very Cool Flickr Slideshow

Something that caught my eye on the Digital Urban blog was a reference to a fantastic little website applet that shows Flickr slideshows with a difference. Called Flickrvision, it shows a near-realtime view of images being uploaded to the Flickr online album website, overlaid on a map of the world. You can overlay the pictures either on a normal 2D Googlemap or, as the screenshot here shows, onto a 3D view of the Earth which spins around to help position the images.

Flickrvision in 3D mode

Flickrvision in 3D mode

You can go straight to the 3D version by clicking this link. There’s no need to install anything – just click & go. To switch to the Googlemap version, just press the “Classic View” button that appears on the screen. It is a great page to just leave open on your desktop, especially if like me you have a two screen set-up.

A game you could play would be to upload photos to Flickr and watch to see if they appear on the globe. Have your favourite screen grabber tool at the ready…

More on Google Maps in WordPress

A quick follow up on the post a couple of months ago about my quest to find a simple way of embedding Google Maps in WordPress blogs. Just to recap, the main issue I had was finding a way of embedding custom maps.

While I still have yet to find a solution to self-hosted WordPress blogs like this one, there is a good solution for anyone who has a blog hosted at WordPress.com. For those of you that don’t know, this is a site that looks after thousands of WordPress blogs for free. They run their own specific version of WordPress – you can’t get at the PHP code or install your own plugins. But it’s a great way to host sites at little or no cost. I run a couple of community sites hosted there, both for the Round Table organisation – see Long Eaton Round Table and also the Area 14 sites.

That version of WordPress provides a tag – “googlemap” – that can take any Google Map reference including custom maps and embed them in the page properly. It works really well – for an example, see the About page on my Area 14 site. Instructions for using the tags can be found here.

Now all we need is the same thing on the regular version of WordPress, and I’ll be a happy bloke.

Blog makeover

header_2

Just a quick note to describe some recent changes to this site.

I’ve changed the template from the attractive but not easily configurable “Feather” theme to Chris Pearson’s “Cutline 3 column” one. The initial advantage of this was it was easy to set up my own header images to be my own photos rather than someone else’s. All the headers are my own.

While it was nice to have each individual page type (posts, archives, pages, about etc) have their own header image, Chris posted a simple mod to the header PHP file that randomly selects an image from a set. Every time you visit the site or refresh a page you’ll get a different header. I intend updating the image set as often as I can. If you read further down this post I have described the header images currently in use.

But there have been more changes than this.

Continue reading

Google maps in WordPress

I have been creating my own Google maps a lot recently, largely in support of an upcoming attempt at the 3 Peaks 24 hour challenge – hiking up the three highest mountains in the UK all in 24 hours. I’ve got various maps for the three hiking trails, plus a few put together to help plan training walks.

I’ve been scratching around for a while experimenting with various ways of sharing these maps, and embedding within a WordPress blog seems a good thing to do.
Continue reading

My photos in Google Earth

My photos in Google Maps

A few weeks ago I wrote about using Panoramio to publish and view images from around the world in Google Earth and Google Maps. At the time I posted just a single beach scene from Hamilton Island in Australia as a test image and noted that it takes a while for these images to appear to any user of Google Earth. At long last these have now appeared!

After I wrote the article I added a few more images I had lying around. After a few weeks, they started being flagged by the Panoramio reviewers as having been accepted by Google Earth.

Continue reading

Panoramio – See your photos in Google Earth

Panoramia overlay in Google Earth

Something I came across recently was the ability to share your own photos of places around the globe using Google Earth. A Spanish company called Panoramio have created a very easy way of selecting locations on the globe and adding your own pictures. Other users of Google Earth can then see these photos by clicking on the camera symbols that get overlaid onto the map.

At first sight Panoramio looks just like yet another website that hosts online galleries. You can store upto 2Gb of pictures for free. Other users of the site can browse your pictures. But the big difference here is that you can do this by clicking on a Google Map window, and have the images appear to other people via Google Earth. A two way link between an image browser list and the map window means selecting an image in either window will select it in the other so you can see in a very dynamic way where pictures were taken. It is much easier to try than describe – go to the Panoramio Map and have a play.

And then the really smart thing is link into 3D with Google Earth. Read on…
Continue reading

Plotting your GPS tracks in Google Earth

Google Earth

As a follow up to my previous post about using Google Maps in conjunction with your own GPS data, you can also do the same thing in Google Earth. Something I missed before was that the same GPSVisualizer site provides the service so that you upload your GPS file, and it generates a Google KMZ file for you. Click on it, and the file gets downloaded and launched in Google Earth directly. Very neat and very easy. Here’s a screenshot:
Continue reading

Playtime with Google Maps and GPS

I’ve been dabbling with Google Maps recently as I want to download some GPS data from my PDA to visualise and analyse journeys that I have made. I also think Google Maps and its 3D sibling Google Earth are the absolute dogs doodads of applications and so any excuse to play with these was welcome.

I started with a .GPS file that was generated automatically by Copilot, which is the in-car satellite navigation software that I use. It’s pretty good, but like all Satnav systems you need to be aware of its foibles to get the best out of it. Never, ever, simply follow the instructions!

The GPS track was a record of my travels on Monday 25th June as I tried to get into work in Sheffield as it was getting hit by freak floods. Getting in was OK(ish), but took a long time. Getting home again was a bit more interesting as I kept trying to avoid all the bad traffic.

Anyway, since I was being forced to turn around and try new routes to avoid flooded roads, jams etc, I wanted to see on my PC where I had been. What I did not know was a quick and easy way to do it.

Copilot has a PC hosted planning application, but that won’t take the GPS tracks that the PDA version generates (sigh….). Ideally I wanted to put the tracks into Google Earth to look at in glorious 3D, but I currently only have the free version that does not allow GPS tracks to be imported.

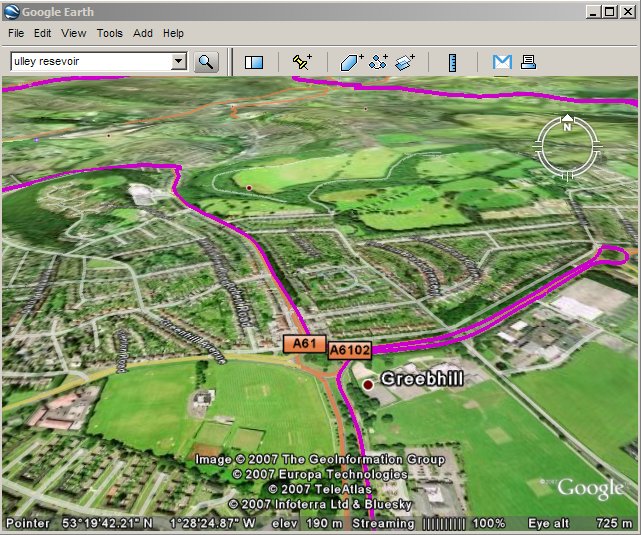
A quick webhunt brought up GPS Visualizer. This provides a free service that allows me to upload the GPS file, and it generates a Google Map with a vector overlay of the results. Even better, the site contains instructions on hosting the resulting map on your own website.

So I had a go at this. The HTML pathway was a huge faff, to be honest, as I was rather foolishly trying to use Frontpage. The problem was that it was trying to be too smart on the Cut and Paste operation, which screwed HTML tags over. In the end, a quick path was to:

  1. View GPS Visualizer page source
  2. Save source to local HTML file on disk
  3. Open HTML with an editor. Even Frontpage could manage this bit!
  4. Locate the Google API key, and replace it with my own (see below).
  5. Set page titles, modify the default 600×600 window
  6. Upload to my website
  7. The resulting page can be seen here.

    If you want to do this yourself you’ll need a Google API key, which you can get from here