This is the third tutorial note to be published from a collection I created in support of a schools IT programme. It covers preserving state between screens, refactoring of code, and passing of values between screens. It is rather a long article as it goes into some detail.
As a reminder, the notes here address one or more specific problems that the students had while writing their own application.
Problem Statement
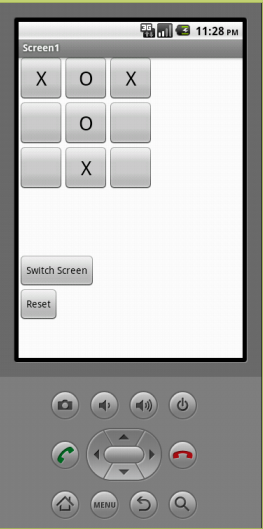
The app has some buttons to represent a Tic-Tac-Toe game – each button in a 3×3 array can show nothing, a X or a 0. Each tap of the button changes the state to the next one. (This game is also known as Noughts and Crosses.)
It looks something like this:
The problem to solve is that the app needs to remember the state of the buttons when switching to a different screen and then coming back.
Solution Overview
I’ll show the solution in two distinct parts:-
The first part is just coding the behaviour of a single button, and restoring its state when you navigate to a different screen and back again.
The second stage extends this logic to all nine buttons. But rather than the naïve approach of simply copying the code blocks nine times, we attempt to write the code just once and use it multiple times.
As part of this solution, we will be using procedures to wrap common tasks up in one place and using it multiple times, and also introduce the technique of refactoring.
Part 1 Saving and restoring button state
There is only one way to save information between screens with AppInventor, and that is to use a TinyDB database object to save and restore the data.
The approach is that for a button called B1, we store one of the following values:
0
1
2
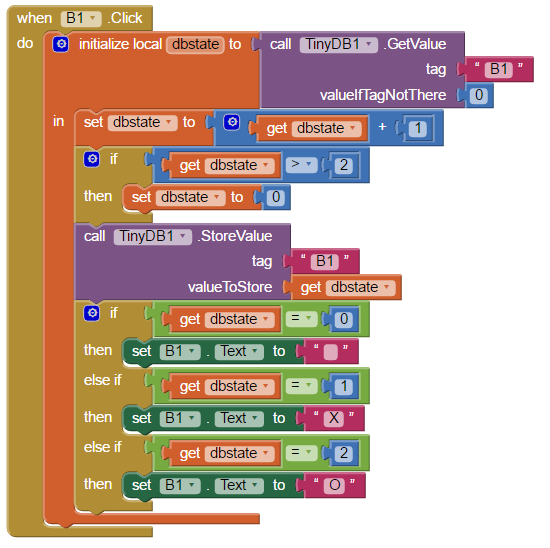
The button’s Click event is used to change this value, and to change the text displayed by the button based on this value. The following code block works as follows:
- Looks in the database for the value stored for button B1. If nothing is in the database, use a value of zero.
- Rather than fetch the value from the database every time we want to use it, we store its value in a local variable.
- Add 1 to the value.
- If the value ends up greater than 2, then reset it to zero. This means that successive clicks makes the value change from 0 to 1 to 2 and back to 0.
- The new value gets stored in the database.
- The new value is used to decide what text should be shown in the button:
- 0 = blank space
- 1 = X
- 2 = O
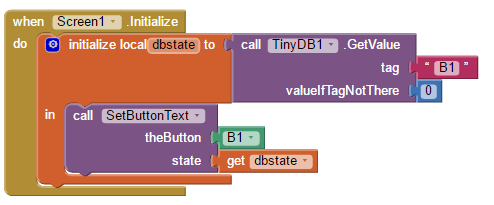
The final step is to use the values stored in the database to initialise the state of the button if the user clicks away to another screen and then comes back to this one.
To do this, you put the following code in the screen’s Initialise method:
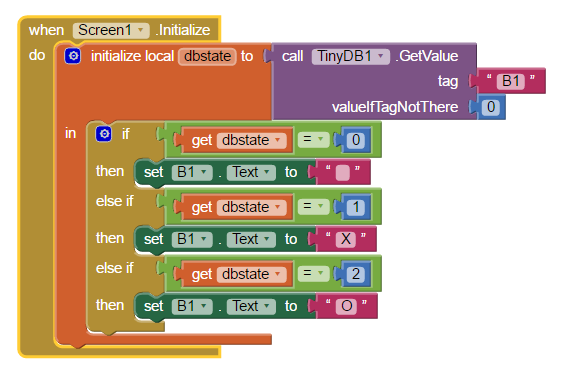
Most of this code is exactly the same as the code in the Button.Click event – it just leaves out the code that modifies the value.
Part 2 – Making all 9 buttons use the same code
As mentioned before, the simple approach if you have more than one button that do similar work is to just duplicate the code blocks for a button, changing the reference to the button object. While this can be fine for a couple of buttons, once you get to more than a few it becomes very laborious, not to mention error prone. Also, if you want to modify the behaviour at a later date, you have to make the same change multiple times.
Instead, what we need to do is somehow write one block of code for each bit of work, and then have each button reuse that code. This is an example of a valuable coding technique called refactoring.
Refactoring is something you generally do iteratively – just take one thing at a time, try it, check it, and then choose something else and go through the same cycle.
In this example, the obvious first thing to notice is the similarity of the if…then…else blocks in the Button1.Click and Screen1.Initialise sections. What we would like to do is make a single procedure that sets the display value of a button given its state taken from the database.
To create a new procedure – something that can be called from different places in your code click on Procedures in the Blocks view:
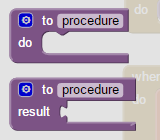
This shows you can create a procedure that just does some work (the first one), or another type of procedure is one that returns a result (the second). For this example, we do not need the procedure to give anything back, so we just choose the first, and call it SetButtonText.
We want SetButtonText to take the state we give it (0, 1, or 2), and also the button whose text to set. Here’s the resulting code:
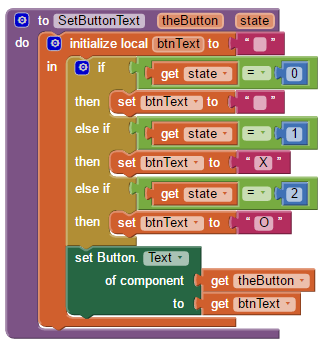
The key to this is the green “set Button” code block. This is one of the blocks found under the “Any Component” group.
Next, we alter the code for Button1.Click so it calls the SetButtonText procedure instead of all the if..then..else statements:
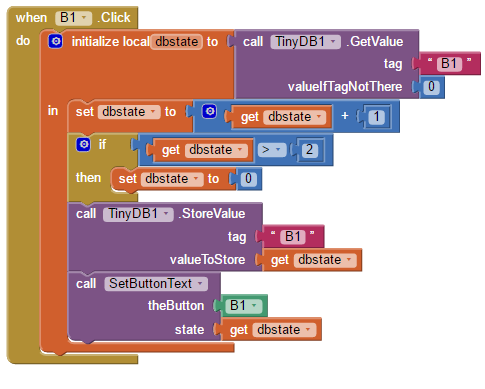
As you can see, this makes the whole B1.Click code block a lot shorter. We also change the Screen.Initialise method in a similar way:
Run the simulator and test the code – it should act exactly as before. The benefit of our refactoring is that we have fewer code blocks to duplicate since we created a procedure. So we could stop there, add the extra 8 buttons and duplicate the procedure calls and database storage tags in TinyDB1. But that is still a lot of duplication. Instead, wouldn’t it be better if we could somehow have a list of buttons and tags, and simply go through these one by one using the same code blocks?
There is more than one way of creating these lists, depending on the data structures we design. A data structure is just a way of describing the format for organising and storing data. For this example, we will use a very simple one:
- One list of 9 buttons
- One list of 9 data tags used to store the state of each of the nine buttons.
To get started on this, we will set things up for just two buttons, and expand to all nine at the end once we have it working for two. This is another example of incremental refactoring that allows us to make changes, experiment, and check in small steps.
First step is to set up the two lists:
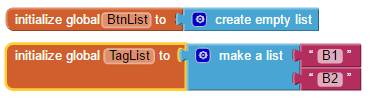
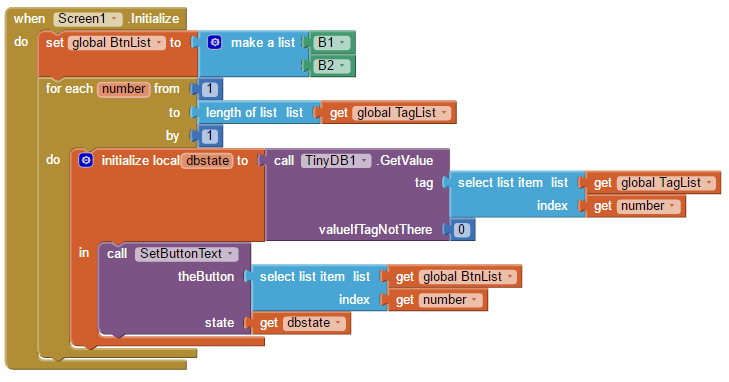
The difference in the initialisation is due to a limitation in AppInventor where the Button objects are not valid as globals. Instead, we add items to this list in Screen.Initialise:

The rest of the initialise method now loops over all the buttons from 1 to the number of buttons in the list – which will be 2 so far. The “for each number from” block executes code incrementing number each time, and we use this number as an index to look up the data tags and buttons in the global lists.
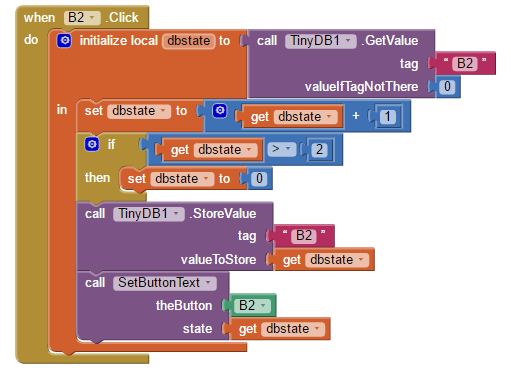
The Button Click block for B1 remains unchanged, and we duplicate it for the second button B2, just changing any reference to B2:
Again, we could accept this, and live with some duplication even across all nine buttons. But we can be better than that and refactor some more.
Ideally we would have a single Click event block that would be called for every button. However, AppInventor does not support this, even with those blocks in the Any Component grouping. So, we are left with having to have separate Click events for each button. But what we can do is refactor the code into a single procedure that takes the button index as an argument. This should mean that every Click event just makes a single call to a common procedure, which does all the work in one place.
First, let’s create the procedure in exactly the same way we did for SetButtonText way back near the beginning of this tutorial. The argument we pass into the procedure will be a number between 1 and the number of buttons, and we will use this number to look up the tag and button object from the global arrays, just like we did in the Screen.Initialise block just now.
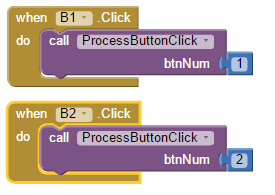
We end up with this procedure called ProcessButtonClick:
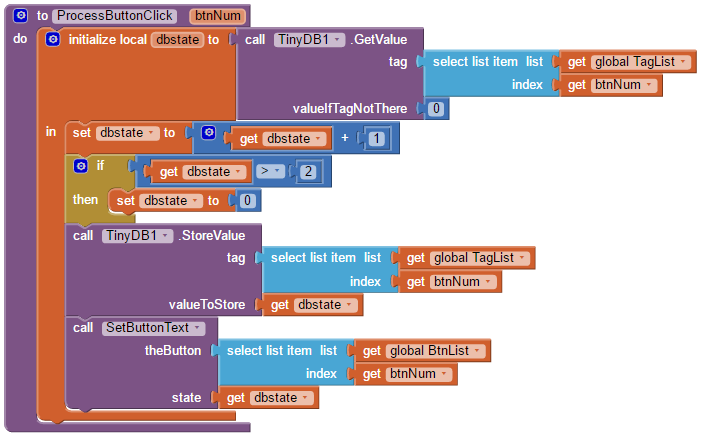
And the actual Click event blocks for B1 and B2 become:
Now all we need to do is create the final seven buttons, add them to the two global lists, and duplicate the Click event handler as above. You can easily do this yourself.
One more thing – resetting the button states
There are a couple of issues with the program as it stands:
- If you run the program again, the Tic-Tac-Toe board gets initialised to the state it was when the program was last run. Ideally, we would like to start up empty.
- It would be useful to have a way within the app of resetting the board.
These two issues are related.
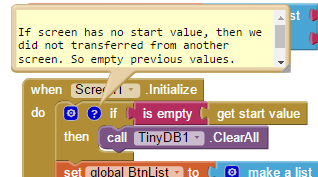
The approach we take to solve the first problem is to clear out all the data tags from the TinyDB database when the screen initialises when the app first starts up. Clearing the database is simple – just use the block “call TinyDB1.ClearAll” from Screen.Initialise.
But the trick is in working out whether Screen.Initialise is being invoked by another screen, or if it is the first screen when the application started. To solve this we use AppInventors’ feature that when invoking one screen from another you can pass a “start value”. If this start value is empty, we assume the app is starting from scratch and clear the database. The beginning of the Initialise block becomes:
And we modify the code in the other screen that loads this one to be:

The startValue text can be anything, as long as it is not empty.
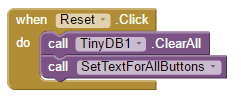
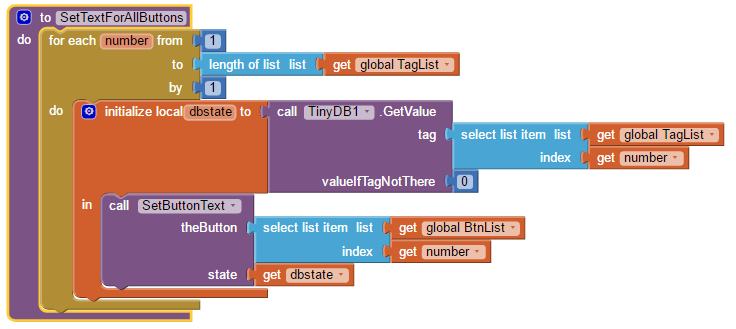
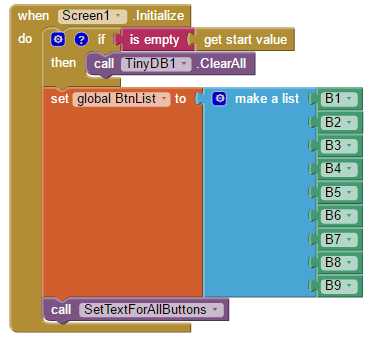
Finally, to reset the board from within the program, we also need to clear all the data tags from the database, and then force the button text to get initialised. But we have already written the code blocks for this last bit! It is in Screen.Initialise, where it loops through all the buttons , querying the state from the database, and then calling the SetButtonText procedure to ensure all buttons get the text set. So let’s refactor this to a new procedure called SetTextForAllButtons, and call it from both Screen.Initialise and also a code block to reset the data (in this example, responding to a reset button):
And Screen.Initialise gets shortened to:
And the reset button becomes simply: